Tuesday, September 13, 2011

How to Save the Photography Industry

corp-linda-203
If you spend any time chatting with photographers or milling around in the photography forums on LinkedIn you'll get a pretty desperate view of our professional industry.  Everywhere you look photographers are complaining that clients have smaller budgets, other photographers are stealing their business by shooting for free, moms with cameras are taking over!  The truth is - photographers need to learn how to evolve!

The photography profession is rooted in tradition.  It's a craft that is both art and science - both creative and technical.  As such, there is no right way to do it.  Just as there are numerous ways to take a photo, there are numerous paths to pursuing it as a career.  You can go to school, you can assist another professional, you can read books to educate yourself on the technical aspects of photography but the hardest thing to learn is the business of photography.  Because there is such a lack of information on how to run a successful photography business we tend to copy or learn from those who have been successful in the past.  We look to other working photographers as a model on how to run our own business.  We send mailers, we run email campaigns, we network.  This is how the industry perpetuates itself.  Each new generation learning from those who have blazed a path before us.  Unfortunately, this is exactly why our industry has grown stale!

One thing I've learned from working in the SF Bay Area is just how quickly an entire industry can move. Silicon Valley is THE birthplace of today's computer technology and I've seen it grow, evolve, boom, bust and transform in the 20+ years I've lived here. I'm not sure why the entrepreneurial spirit here is so high - maybe it's the weather, or maybe it's because we have more venture capital firms than anywhere else in the country.  One thing is certain, the Valley never quits.  There is always some new idea, some new technology, some new college graduate thinking they have the next Facebook!  You very rarely hear people complain about the competition, or blame their customers for the lack of business, or whine about technology moving too fast.  When business starts to slump they look internally, not externally, and will change their business strategies on a dime!

If the photography industry is to survive, we need to adopt these types of business practices.  We need to stop clinging to business models that were created in the days of film.  We need to stop thinking that we are "owed" a successful business just because we know how to use a camera. We need to stop comparing ourselves today to the photographers of yesterday.  Yes, the industry has changed. Yes, technology moves fast.  Yes, everybody can take great pictures now.  So look internally and ask yourself "What else can I bring to the table?"

If your clients aren't paying you what you think you deserve it's because they don't value what you offer.  Commercial photography is a service industry and you can either be a $20 table massage or a $200 spa treatment, the choice is up to you.

Sunday, September 11, 2011

New Production Gear

We've recently upgraded our production equipment so that we can better serve our clients and work more efficiently. One of our new items is the Magliner production cart.  The Magliner is the defacto standard in the TV & Film industry as the go-to workhorse cart.  These carts begin their life as convertible hand carts but can be infinitely customized to suit your needs.  Our cart features the 30" nose extension which holds two carpeted shelves.  The bottom shelf carries our Location Lighting kit, Digital DSLR kit, Medium Format film kitDIY Battery Packs and light modifiers.  The top shelf is our working surface and holds our MacBook Pro, Apple Cinema display and other digital capture equipment. Our light stands are strapped to the outside of the nose extension and the right side of the cart holds our grip equipment like extension cords, clamps, gaffer tape, etc.  We even have an oversized umbrella to keep the equipment dry on those rainy day shoots! Our new production cart reduces setup time by allowing us to move everything we need - all at once!

Styling chair
The other addition to our production gear is our new styling chair.  The old-style director's chair has now become a lightweight, folding aluminum chair with a foldout table and accessory bag provided by Earth Products.  The tall chair folds flat and becomes really easy to use on location. We've added a super-bright LED lamp so our stylist Ivonne can do her magic in the studio or on location in the lowest of light.  The foldout table holds her styling brushes and her cosmetic kit is easily located for quick applications.

All of this new equipment allows us to get a job done as quickly and easily as possible.

Friday, September 2, 2011

Your guide to the latest photography trends & fads

We're living in an exciting time for photography, a renaissance really.  Never before have we had the tools to create images so easily accessible.  You're probably wearing one right now in your pocket or purse if you have a smartphone.  Not only are digital cameras cheap and ubiquitous but we have so many platforms to publish our photos instantly to a global audience with the push of a button.  The upside of all this new technology is the creativity that it's been inspiring from the people who use it.  We've been seeing a LOT of new trends in photography due to the social nature of photosharing and we thought we might help de-mystify some of the most popular ones for you.  So in no particular order we have...

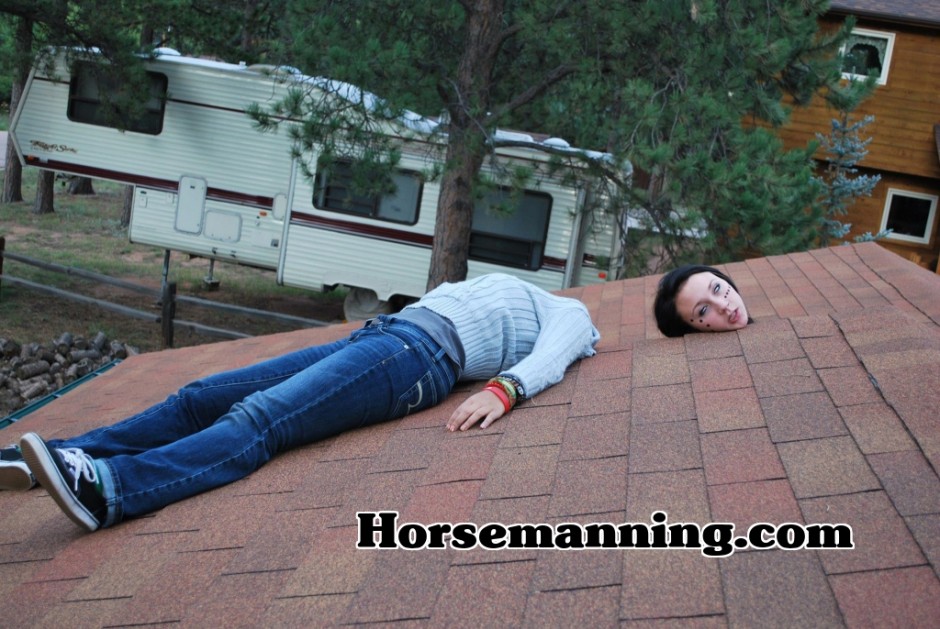
HORSEMANNING is actually a revival of sorts.  It got it's origins from "The Legend of Sleepy Hollow" and was a popular photography fad back in the 1920's.  To properly pull off a horse manning requires two people where one person hides their head and the other person hides their body.

Visual exampleshttp://www.horsemanning.com

PHOTOBOMBING is the technique of appearing randomly in the background of someone else's photo in a lewd, dorky, creative or ironic way.  The trick is to do it right before the photo is taken so that nobody will notice until they look at the photo. Sometimes it happens serendipitously, sometimes it's premeditated but it's almost always hilarious. It's especially funny when celebrities do it!
Used in a sentence - "Charlie Sheen photobombed my wedding portrait."
Visual examples - http://www.thisisphotobomb.memebase.com

PLANKING is the fine art of photographing yourself, or having someone photograph you, while your body is straight, stiff like a board and positioned in a unique or awkward angle - face down.  Generally the more difficult or creatively placed your 'plank' is, the more points you score.  Not for people with lower back problems!

Used in a sentence - "We saw this guy planking in the sewer!"
Visual exampleshttp://www.planking.me


LEVITATION is a technique used to make yourself appear as if you were hovering or levitating just above the ground.  In theory, you simply jump into the air just before the camera is triggered, but in practice it's much more difficult.  The trick is to jump into a pose that doesn't "look" like you jumped into a pose.  Also requires strong legs!
Visual examples - http://yowayowacamera.com
How-to Videohttp://www.digitalrev.com/en/how-to-do-levitation-photography-9276-article.html

IN-GAME CAR PHOTOGRAPHY has become in interesting new genre of "virtual" photography as game developers have introduced the ability to take still photos of the virtual worlds they create.  It started as the "instant replay" feature in race games but has become so sophisticated that the developers of Grand Turismo 5 allow you to control the aperture, shutter speed and focal length of a virtual camera in a virtual world of virtual cars with stunning detail.
Visual exampleshttp://www.gtplanet.net/forum/showthread.php?t=137684

If we've missed anything up-and-coming or if you know of a trend we missed, let us know.  Leave a comment!

Thursday, August 11, 2011

What's wrong with stock photography?

A large part of our target market is made up of independent and small business owners who may think that buying stock photography is a good option for them.  After all, it's cheap, widely available and easy to purchase. Part of our sales pitch is trying to educate these clients on why buying stock photography is the wrong option for them.  It goes something like this...

Branding is all-important these days and should be one of the first thing you define when starting a new business.  Your brand is what sets you apart from your competition and gives your customers something to identify with. Your brand is not your logo, your name or your color palette - your brand is the feeling your customers have about you.  Potential customers want to know that you're the right "fit" for them and they make these judgements extremely quickly which is why it's so important to maintain your brand consistently throughout your marketing channels. There are a whole host of tools you can use to create this feeling such as the tone of your messaging, the design of your marketing and advertising collateral, and especially your social networking.  One of the biggest tools you can use to express your brand is photography!  We are visual creatures and you can communicate an entire story in one image.  Remember the adage - "one picture is worth a thousand words."  So when it comes to creating a feeling and desire in the minds of your customers for your products or services, there's no better way to do it than with pictures.

Now the important question becomes...WHICH pictures?  How do you find photography that expresses exactly what you want to communicate about your brand to your customers?  This is where it's tempting to resort to stock.  It's easy to just load up a stock agency on your browser, sign up for an account, add a credit card and browse away.  But when you look closely at the content of stock photography you'll notice how generic it is.  Photographers who shoot stock are taking a "shot gun" approach to subject matter and hoping they shoot an image that you'll buy.  Don't get me wrong, there are some very talented stock photographers who shoot images that could be described as art - but they haven't had a conversation with you about your specific needs or tried to understand what your message is.  To me, stock photography is the McDonalds of the photography world.  It's cheap, easy to find, but completely lacks substance and leaves you feeling like crap after you eat it.

If you have a well-crafted brand and care about communicating the subtly of that brand to your customers to evoke a real emotion or feeling - you should really commission an experienced photographer to help you.  We love working with independent and small business owners to help express and define their brand to create a real desire for your products or services.   We're like the Whole Foods of the photography world.  You may pay a little more but you enjoy the experience, you get exactly what you want, and you feel great about your purchase!


Monday, May 16, 2011

How To Capture Action

CatsHill-210.jpg

Capturing fast-moving action is essential for sports photography and there are a few things to know before taking on this challenge.

The first thing you need to decide when capturing fast-moving objects is how you want them to appear in your photograph.  In the shot of the bike racer above we wanted to enhance the feeling of speed by blurring the background but there may be cases where you want to freeze the action so that everything is in focus.  The trick to this creative style is choosing your shutter speed appropriately.  The faster your shutter speed, the more you can stop motion - the slower your shutter speed, the more blur you create.

To achieve the shot above, we set our camera to Tv (Shutter Priority) so that we could adjust our shutter speed and let the camera set the aperture automatically.  Normally we would meter the scene with an ambient light meter and shoot in Manual mode but this day was partially overcast and the light values were changing constantly due to the cloudy conditions so we wanted to let the in-camera meter do some of the heavy lifting. We chose to shoot at ISO 200 so that we could reach higher shutter speeds without introducing too much noise. To get the right amount of blur we used trial and error (also knows as "chimping") until we settled on 1/50th. Finding the right speed is a but tricky because if you go too low, it becomes impossible to hold the camera still enough to capture anything sharp. You'll have to experiment a bit to get the right setting.  The camera adjusted the aperture to f13.

Another challenge when shooting fast-moving subjects is focus.  This is where a high-end, professional camera really pays for itself.  Our Canon EOS 1d Mark III is known as a "sports shooter" and has a newly redesigned auto focus system with 45 auto-focus points, 19 of which are "cross-type" points which can focus on horizontal and vertical lines of contrast.  To get this shot, we set our auto-focus to AI Servo mode which can intelligently track moving objects to predict correct focus.  Proper focus, however, isn't magic and doesn't always require such sophisticated technology.  Road criterium racing is a great way to get started with sports shooting because the riders complete a lap roughly every 2 minutes so it gives you plenty of opportunity to setup a shot.  To get this shot without a sophisticated auto-focus system you could simply set your lens to manual focus and pre-focus your lens to the spot you want to shoot.  We always have a "zone" in which we want the shot to take place.  To establish our zone we study the background/foreground elements, lighting, and path the riders take in the road and determine what will make the best composition.  Once you have a zone picked out it's pretty simple to pre-focus on something in that zone.  This is another area where "chimping" is perfectly acceptable - while determining the right focus for your zone, just use trial and error until you get it right. That's one of the beauties of digital photography!

The last thing you'll need to capture action is a good technique.  All good sports shooters have a natural instinct for being able to anticipate the "right" moment that comes with years of experience and an in-depth knowledge of the sport.  There are some things you can do however to improve your chances.  Set your camera to Continuous shooting mode.  In this mode your camera will take a photo as fast as it can for as long as you hold the button down.  When shooting in Continuous mode, you can start shooting a slight second before the moment and continue shooting slightly after the moment to ensure you captured just the right shot.  Another technique that we used for the shot above is "panning".  If the camera was held completely still at 1/50th, the rider would pass right through the frame before the shutter closed, rendering him completely blurry and the background completely in focus - the exact opposite of what we wanted.  So to properly pan this shot, we begin pointing the camera at a location slightly down the street and as the rider rides by we move the camera to the right, following him at exactly the same speed he is moving.  This takes practice and patients but when you get it right, it's magical.

Tuesday, May 10, 2011

How To Balance Flash & Daylight


For those of you who participated in our poll, it's clear that you are interested in more "how-to" articles and one of the common questions we get asked is "How do I balance flash light and day light?"  To answer the question, let's deconstruct one of our images in which we balanced a sunset with off-camera fill flash.

In this image, we positioned our model high up on a grassy hill with the sunset behind her.  Definitely a challenging scenario for a camera set to Auto mode.  What you would get would be an image that was exposed for the sky and a model completely obscured by shadow.  If your camera has a built-in flash it would probably use it to fill the model but on-camera flash will produce very harsh shadows and potentially some red-eye.  The solution to lighting this scene is to balance an off-camera flash with the available daylight.

Learning how to deconstruct a photograph is a valuable tool for learning and there are two things that will make it easier.

  1. Find the light source(s) by observing the shadows
  2. Look into the reflections in the eyes to see the shooting setup
In this case, you can't see her eyes close enough but if you look carefully you'll see the tell-tale signs of a double shadow under her forearms and around her hands.  This tells us immediately that at least two light sources were used to light her.  And if you look REALLY closely you can see that one shadow is darker and harder than the other, which tells us that one strobe was set to a lower power than the other.

Ok enough guessing...here's how to balance flash & daylight for an image like this.  The first thing to do is determine the base exposure value for the scene.  In our case, we measure exposure by taking an ambient reading from our Sekonic L-758DR light meter. Set your camera to M mode and use this exposure setting to control the ambient light.  Now we can make our creative decisions.

We knew we wanted this scene to be bright and cheerful with a small difference between the fill light and sunlight.  The first creative decision you need to make when balancing light is "how much balance do I want to achieve?".  In this case we wanted a natural looking image that didn't look like we were using artificial light but we underexposed the ambient scene by 1 stop so that we could saturate the colors a bit more.

The next thing to do is determine your strobe exposure.  The placement, power output and diffusing of your lights will all help achieve a specific look.  We placed two AB800 strobes with standard parabolic reflectors on either sides of the model at about the same distance as the camera.  We then used our Sekonic L-758DR to trigger the strobes and take an exposure reading.  We lower the power output and take another reading until we achieve the same exposure value as the ambient light (eg: both ambient and strobes measure f8)  We then dropped the power settings of the left strobe so that the front of our model didn't appear flat.  If we had lit her completely evenly with two strobes there wouldn't be any depth to her clothes or body.  We used one more light directly behind the model to create a "rim" effect on her skin and hair. That light source is called the Sun!

Learning to balance strobe and ambient light is an extremely powerful technique that will elevate your photography to the next level.

Sunday, May 1, 2011

Accept Credit Cards with Square


Looking for a way to accept credit card payment quickly and easily with your iOS or Android device.  Look no further than Square.  We've been using this small business solution for a few months now and have fallen in love with the technology.  You simply sign up for an account, link a bank account for your deposits, and after you receive your free card reader in the mail, you're ready to start taking credit card payments.  There's no yearly fee, no activation fee, no hidden fees at all really...just a 2.75% transaction fee.  Give it a try!

Wednesday, April 20, 2011

Portfolio Review with Stella Kramer

We're really excited today!  We have a portfolio review today with award-winning photo editor, Stella Kramer.  Stella Kramer is a Pulitzer Prize-winning photo editor who has worked in the New York publishing industry for more than 15 years. She began her career at Vanity Fair, was a photo editor at Newsweek, and served as Director of Photography at Brill’s Content. She has also worked as a freelance photo editor for major publications including The New York Times, People, Entertainment Weekly, Sports Illustrated, and Money.  Currently Stella works as a consultant to photographers, helping them to strengthen their creative eye, put together the strongest portfolios and websites that reflect their work, and set a course to reach their professional goals.

Wednesday, April 13, 2011

Case Study: Caletti Cycles Brand Campaign

Over the course of the next four weeks we'll be shooting a brand campaign for a local, independent bike builder in Santa Cruz.  I thought it might be interesting for ya'll to see what goes into shooting a project like this and get a glimpse into the creative process - from concept to completion.

THURSDAY, APRIL 29, 2011 - INITIAL CLIENT MEETING
We had our first client meeting with John Caletti of Caletti Cycles in Santa Cruz, CA.  John has been hand-building bicycles since 2003 and over that time has made an impressive career building custom bicycles for his unique clients.  We reached out to John to help expand their brand using photography.  The purpose of the initial meeting is to gather the information that will help us define the creative direction for the project.  We talk about things like brand messaging, and target audience and we kick around keywords that help define the emotional connection we want to create.  John built his business with the principals of a unique craftsmanship, a responsibility to the environment and the Santa Cruz community, and an authentic passion for all things cycling – and with his brand he wants to cater to authentic people who are healthy, unique and passionate about the ride in whatever form it takes.

SATURDAY, MAY 7, 2011 - CLIENT CREATIVE MEETING
Today we met with John to discuss the creative direction for the campaign.  At this point, it's important that John and I are on the same page about the concept and that we both walk away from this meeting knowing exactly what we want to communicate and how we will show it visually.  The concept that I wanted to present had to do with creating 3-4 mini success stories from his customers in a visual style.  John really works closely with his clients to create a bike that is just as unique as they are so I wanted to highlight some of the customers that have benefitted the most from his process.

Creative Concept = Showcase each facet of Caletti Cycles culture by focusing on individual riders/clients and their personal stories.

The campaign will highlight one rider from three different genre's of cycling - road, cyclocross and mountain biking.  Because one of the core values of the Caletti brand is "authenticity" we want to shoot real customers in their real environments on their real bikes and showcase the real culture that surrounds each genre.  Once finished, the campaign will live as an image slideshow on www.caletticycles.com which shows each rider doing what they do best, on their bikes, with a testimonial quote about John and unique elements about their bikes.

Now that we know what the driving concept will be, we can dive into pre-production.  We know that we'll be featuring 3 riders of various cycling genre's so John will begin to touch base with his clients to see who's interested in being featured.  We also know that we'll be shooting a road rider, cyclocross rider and a mountain biker so we can start to plan for locations.  Ideally we'll look for a location that can support both road and trail bikes within a close distance to each other to minimize travel time in between.  At this point I'm also starting to get an idea of what kind of images I want to shoot and how I want to shoot them.  I have an idea to mount our Canon G10 to the bike frames using a Manfrotto Magic Arm and trigger it remotely with our Paul Buff Cyber Commander unit while the riders are on their bikes.

Now it's time to book the crew and start scouting for locations.

Check back with us over the course of the project and watch the events unfold!

Tuesday, March 29, 2011

EasyRelease for iPad

The iPad has quickly become an integral part of our business. We blogged earlier on how we use the ipad with an Eye-Fi card which allows us to review images in real-time during a shoot. Talent, crew and clients have all commented on how much they appreciate being able to review images while they're being taken. It's become a very valuable photography tool for us.

The iPad has taken on a new role in our business now by helping with model releases. A new app for iPad called "Easy Release" makes the process a no-brainer by allowing us to create, manage and send model or property release forms, all from the iPad.

I'm notorious for packing the gear I need, but completely forgetting the correct paperwork. I have model and release forms posted to my website for download but that relies on the talent to take the initiative and fill it out. An on-site solution is ideal for me and Easy Release by Application Gap fits the bill perfectly.

On first launch, you can enter all of your default information such as photographer names and contact info. You can even attach a company logo for customization.  Once this information is stored, you never have to enter it again.  When it's time to create a release, the app walks you through, step-by-step, as you collect the shoot info, model info, and witness info.  Once all the data is entered you can turn the device sideways and have each stakeholder sign the release by using their finger.  You can even use the built-in camera of the device to capture a reference image of your talent. Once everything is completed and signed you can send a copy to everyone instantly.  Both you and the model will have a completed and signed form waiting in your email by the time you get home.

Easy Release has an impressive list of features compared to it's competitors and a very reasonable purchase price.  Application Gap also advertises versions for iPhone and Android devices as well.

Monday, March 28, 2011

Young Executive

This weekend we organized a test shoot with a fantastic model by the name of Eric Stackpole to try out some new corporate looks.  A "test shoot" allows us the chance to work with new talent and try out some concepts without jeopardizing a client project.

For this shoot we were trying to capture the unique qualities of a Silicon Valley tech company.  The Bay Area has a unique style of business when compared to other metropolitan areas and we wanted to capture that style.  The Bay Area, a hot spot for technology game-changers like Apple, Twitter, and Facebook, has a very casual approach to business.

Eric is a great example of today's high-tech workforce - young, creative, and smart - and he did a great job by giving us the energy of a young entrepreneur.  HP was gracious enough to allow us to shoot in the lobby of their newly acquired Palm building in Sunnyvale which was the perfect venue for a high-tech, corporate look.

See the whole set on our Flickr page.

Saturday, March 12, 2011

Neutral Density Filters

Here's a great tip.  Have you ever found yourself wanting to shoot with your lens wide open so that you get that dreamy Bokhe effect but the sun is so bright you have to stop your lens down?  This is the perfect time to break out a neutral density filter kit.  These filters attach to the front of your lens and reduce amount of light that enters your camera which allows you to shoot with a larger aperture.  If you're metering through your lens then you don't have to change a thing, simply screw the filter on your lens and enjoy an extra 1-3 stops.  If you use an external or handheld meter than don't forget to compensate your exposure depending on the filter you're using.

Thursday, March 10, 2011

Time-Lapse Workflow


Shooting time-lapse footage is a lot of fun and a great way to compress time into short video clips but it's not without it's challenges.  We've spent a lot of time shooting time-lapse and made plenty of mistakes in the process. For example, it took three separate trips to the Christmas in the Park event to get the footage you see above.  To get the best possible quality from our footage we also tried four different workflow methods to finally find the best solution.  If you're interested in shooting time-lapse footage, here are our recommendations on getting the best quality out of your workflow.

THE BASICS
If you're new to time-lapse we suggest you head over to our friends at Photojojo who've created a nice guide to get you started.  Once you're comfortable with the basic steps needed to shoot a time-lapse and you've purchased your Intervalometer, we've created a time chart to help you determine your interval time.  The next step is to determine your image format.

CAPTURE FORMAT
Determining your image capture format can be a tricky decision because your image format may affect your interval time.  We ran into this problem quite a few times with frustrating results.  Your choices are basically RAW or JPG.  We always prefer to shoot RAW because it gives us the full resolution of our sensor which in turn gives us the greater quality final image.  The problem with RAW however is that some cameras cannot process a RAW file quickly enough to allow a 2 second interval time for example.  We found that our Canon 1Ds could only shoot 1 RAW image every 4 seconds without filling the buffer.  Remember we need to shoot 100's of frames to create one 24fps video clip so if your camera buffer fills up after 24 frames then you won't be able to complete your entire sequence.  RAW files are also much larger and will quickly fill your storage card which cause a lot of headaches. We choose not to shoot JPG, even though our camera will process a JPG image much faster and the file sizes are significantly smaller, because it doesn't give us the quality or latitude in post-production.  A JPG image is rendered in-camera and cannot be adjusted later without degrading the image.  We found the perfect solution in the sRAW format.  sRAW is a relatively new image format which is based on RAW.  The file is identical to RAW only 1/4 the resolution and 1/2 the file size.  To produce 1080p time-lapse videos, sRAW is the way to go!


DETERMINING EXPOSURE
This step is the most crucial and most difficult step of the entire process.  Because of the fact that a time-lapse sequence takes place over a certain duration of time, you will have to deal with the fact that your ambient light and color will change.  What you're trying to do here is reduce the amount of flicker you get when you assemble your footage.  If your camera settings change (even slightly) during the image capture, you'll get a really annoying flicker effect when you playback the video sequence.  The first thing we recommend using is a custom white balance.  Pull out your neutral gray or white card and take the time to create a custom white balance for your sequence.  This is even more important for night sequences.  We found the WB presets in Canon cameras to really suck at night so we always use a custom WB setting when shooting at night.  Setting your exposure will be a creative choice so while we can't help you determine your exposure, we can give you some tips.

  1. We suggest setting your camera to Manual mode but if you choose to use an automatic meter, use Aperture priority so that the camera changes shutter speed and not your aperture.
  2. If you can tie your spot meter mode to your auto-focus point, do it!  Then set your AF point to a fixed position of your scene that the camera can meter on without too much interference.  This will hopefully provide a consistent exposure and not have your exposure jumping around to much during the sequence.
  3. When shooting at night be sure to shield your eyepiece from any stray light that might enter from say your LCD monitor.  This stray light can throw off your meter reading slightly and give you a wrong exposure setting.
Our last tip has to do with focus.  ALWAYS set your camera to shoot in manual focus.  This is the first thing that will severely screw up your sequence as your images have a different focus point from image to image.  Remember the MOST important thing to keep in mind is to create a consistent environment that changes as little as possible from shot to shot.  


POST PROCESSING
Here's another area where we learned quite a bit from trial and error.  Again, our goal was the absolute BEST quality output we could get published to Vimeo.com.  There are a lot of moving pieces and a lot of little decisions that play a part in the final output quality.  On one side of the spectrum you could easily shoot a sequence of JPG's, assemble them in Quicktime 7 Pro and export them using a simple preset and be perfectly happy with the results.  To get the best quality output however takes a little more work.  Our workflow goes something like this:

  1. Import sRAW files into Lightroom for processing.  This step can be optional, but we find that processing RAW is easier in Lightroom than in Camera RAW.
  2. Import the original RAW files into Adobe After Effects as an "image sequence".  When you do this, you will be shown the Camera RAW interface where you can choose to adjust your images using the standard RAW adjustment controls.  If you previously edited the images in Lightroom, you will see your adjustments in the Camera RAW dialog. Once you are done with the Camera RAW adjustments the images, After Effects will automatically assemble them into one "camera raw sequence".
  3. Use After Effects to apply any motion, titles, or effects to your sequence.  We like to add music to our clips and we'll be honest, After Effects sucks at this!  We've tried to export our edited sequences into other programs that better handle music tracks and would always loose quality no matter what setting we used so we just live with After Effects and suffer through it.
  4. Export your final composition using the following guidelines from Vimeo.  If you're using another site to host your video you should google what their compression guidelines are.  If you can't find their guidelines posted than switch to Vimeo!
The best advice we can give here is to keep working with your source files in the same application if possible.  Every time you have to export/import footage or convert footage to a different format you loose quality.  Keep your source footage as high resolution as possible during the workflow and only compress or convert it at the very last stage.  After Effects was the best application we found for their video compression algorithms.  We've heard good things about using Quicktime 7 Pro for compression as well.  

MORE RESOURCES
We hope you've learned a thing or two from our real-world failures and wasted hours of experimentation.  If you're looking for more information here are some resources that can help.

Saturday, February 26, 2011

Time-Lapse Time Table


It's no secret that we like shooting time-lapse footage.  It's a great way to compress time and show things that you couldn't ordinarily see with the naked eye.  Shooting time-lapse however can be an excruciating experience.  You need to anticipate what your scene will look over the course of several hours, then you need to dial in your manual settings before shooting your sequence.  If your shutter speed, aperture, white balance, or interval length are off slightly you probably won't get another chance to shoot the sequence that day.

In order to help us plan our time-lapse sequences we put together a quick table which helps us determine how many frames to shoot, the interval duration between shots and how long we need to plan on shooting to get enough frames to make a video clip.

There are two charts, one with a 5 sec final video clip length and one with a 10 sec final clip length.  Both charts make the assumption that your final video clip will run at 24 frames per second.

Your Shoot Interval will be a creative decision.  For fast moving scenes like people walking or clouds moving you should shoot with a faster interval like 2-5 seconds.  For slow moving scenes like weather patterns or plants growing you should shoot a slower interval.

To use the charts, first decide what your shoot interval will be.  Then set your intervelometer to shoot the Total Frames with the Shoot Interval and be prepared to wait the amount of time Shoot Length shows.

It's not rocket science but this chart does help avoid doing the math so you can concentrate on your settings.  Hope this helps!  You can download a .PDF of this here.


Final FPS Final Length Total Frames Shoot Interval Shoot Length
24 fps 5 seconds 120 0:00:02 0:04:00
24 fps 5 seconds 120  0:00:03 0:06:00
24 fps 5 seconds 120 0:00:05 0:10:00
24 fps 5 seconds 120 0:00:10 0:20:00
24 fps 5 seconds 120 0:00:15 0:30:00
24 fps 5 seconds 120 0:00:30 1:00:00
24 fps 5 seconds 120 0:01:00 2:00:00
24 fps 5 seconds 120 0:02:00 4:00:00
24 fps 5 seconds 120 0:03:00 6:00:00
24 fps 5 seconds 120 0:04:00 8:00:00
24 fps 5 seconds 120 0:05:00 10:00:00
24 fps 5 seconds 120 0:10:00 20:00:00
24 fps 5 seconds 120 0:20:00 40:00:00
24 fps 5 seconds 120 0:30:00 60:00:00

Final FPS Final Length Total Frames Shoot Interval Shoot Length
24 fps 10 seconds 240 0:00:02 0:08:00
24 fps 10 seconds 240  0:00:03 0:12:00
24 fps 10 seconds 240 0:00:05 0:20:00
24 fps 10 seconds 240 0:00:10 0:40:00
24 fps 10 seconds 240 0:00:15 1:00:00
24 fps 10 seconds 240 0:00:30 2:00:00
24 fps 10 seconds 240 0:01:00 4:00:00
24 fps 10 seconds 240 0:02:00 8:00:00
24 fps 10 seconds 240 0:03:00 12:00:00
24 fps 10 seconds 240 0:04:00 16:00:00
24 fps 10 seconds 240 0:05:00 20:00:00
24 fps 10 seconds 240 0:10:00 40:00:00
24 fps 10 seconds 240 0:20:00 80:00:00
24 fps 10 seconds 240 0:30:00 120:00:00

Tether To An iPad Wirelessly

As with most photographers in the Bay Area we take a particular interest in new technology that promises to make life easier for us.  There have definitely been a few game changers lately - iPhone and iPad being two of them. But one product in particular, not only stands up to it's promise, it actually blew us away!

The Eye-Fi memory card is a standard looking Secure Digital memory card in a 4GB or 8GB configuration.  You stick it in your digital camera and it works the same as you would expect any SD card to work - storing files and all. The genius of the technology however is the Wi-Fi radio built into the card itself!  What this allows you to do is leverage an existing Wi-Fi network to wirelessly stream the photos from your camera to a desktop, laptop or yes... an iPad.

We ordered an Eye-Fi Connect X2 4GB card recently and wanted to see how useful it would be to shoot images to our iPad in a real-world, professional environment.  Would it be as cool as Lee Morris showed us in his FStoppers YouTube video? Would we be able to use it in the studio as a new proofing tool?  Let's find out!

The good news is the Eye-Fi card definitely performed as advertised and provided us with some nice "cool factor" points. The bad news is that it won't replace tethering to your workstation for professional studio shooting.

We purchased the basic Connect X2 card which gave us 4GB storage capacity and 802.11n wireless transfer speeds.  If you spend a little more you get other nice options like Geo Tagging and Direct Mode capability.  Eye-Fi recently announced that the Direct Mode feature will be available to ALL X2 cards with a firmware update sometime soon.  That'll be nice because what that will allow us to do is create a small 'virtual' network just between the card and the iPad instead of having to rely on an existing Wi-Fi network.

So how did it work?  Well before you can use the card you have to sign up for an Eye-Fi account and configure the card to work with an existing Wi-Fi network.  Apparently the network configurations are stored on the card so the cards have to be configured with the desktop software first.  The configuration was quick and simple enough however it must be done every time you change networks.  This could be a real pain if you plan on using public Wi-Fi networks.  Our recommendation on this is to bring your own wireless network.  We used an Apple Airport Express for this purpose.  You don't need an internet connection, just an active Wi-Fi network.

The partner in crime to this wireless solution is the ShutterSnitch app for iPad.  Neither Eye-Fi or Apple make an application for listening to the Eye-Fi card so that's where 2ndNature software filled the gap with their ShutterSnitch app for iPad and iPhone. It's a $15.99 purchase from the iTunes App Store but it's in version 2.0.2 now so apparently there's enough of a user base that 2ndNature keeps the app updated.  The app is simple in design and does what you expect.  You can create Collections and within the Collection you can view images, thumbnails and zoom in/out on images.  It even adds a few interesting features like alerts if your images don't match customized criteria like shutter speed or ISO.  Kinda neat!

Now here's the rub - It's slow!  We tried various configurations and found that if we shot anything other than Small JPG's it was painfully slow to transfer the images.  The transfers were consistent however and if the transfer lagged for any reason it was good about keeping in sync with what was shot.  Initially we were nervous that that ShutterSnitch was missing images but sure enough, every image shot was transferred eventually.  We used the card in the Canon 1d Mark III which contains a CF slot and SD slot and allows us to save different image sizes to each slot.  We were able to shoot RAW images to the CF slot and Small JPG's to the SD slot which would be transferred to the iPad.  It took 4-6 seconds on average to transfer an image wirelessly.

So is it useful?  That depends on what you need.  It's fun for Art Directors to sit back in a comfy chair and review images at their leisure instead of hovering over your shoulder or the shoulder of your digital tech.  It's useful for lighting assistants or stylists to be able to review their work in almost real-time.  It's great for "chimping" while you setup because a 9" LCD is always better than a 3" LCD. Where this technology really shined for us was while shooting time-lapse images of San Francisco. When it was 40 degrees outside, we could monitor the camera from inside our warm car.

Ultimately this is just another tool in our toolbox and will come out when the tool is right for the job. I think what this technology does best is provide another window into the digital workflow.  It adds a new collaborative tool to the process where, during a shoot, the photographer and other creatives can gather around the screen and discuss in real-time how the shoot is progressing.  For us, anything that helps the creative process in this way is a great thing!

UPDATE: April 20, 2011
The guys at Eye-Fi have made their Connect X2 cards even BETTER!  They've added the "direct mode" feature available to all users of the X2 card via a firmware update.  This now gives us the ability to send photos from the camera to the iPad without an existing WiFi network.  Yes that's right, the card itself can now act as it's own wireless access point.  If there are no "remembered" WiFi networks in range the card will start it's own wireless network which the iPad can connect to and recieve images.  The new firmware update even extends the wireless range and improves the reliability.  

Friday, February 25, 2011

DIY Battery Packs

When powering strobe lights on location, a reliable power source can be a huge issue. One option is to bring your own power solution but that either means a loud generator or heavy battery packs. Paul Buff, Inc. makes a portable power solution based on a seal lead acid battery they call Vagabond II, and just recently introduced a lithium version called Vagabond Mini. Profoto also makes a portable battery solution for their D1, ComPact and Acute2 flash equipment they call the BatPac. All of these solutions are reliable and extremely useful on location but they can be pricey!


Luckily there are some do-it-yourself options which will save you quite a bit of money. I do have one disclaimer: I am not an electronic specialist. I took an electronics class in high school and can do some basic soldering but that's about it. What follows is my personal experience and not a professional recommendation. My goal was to build three batteries, one for each one of my strobe heads. That way I could attach one pack to one head and have the freedom to move my lights around without tripping on extension cords. Here's how I built three individual battery packs for less than the cost of one Profoto BatPac.

STEP 1: FIND THE RIGHT POWER INVERTER
The key to getting this system to powering your lights correctly is finding the right power inverter. There are a lot of cheap power inverters that will convert volts to watts but they don't output that power correctly. What you need is called a "Pure Sine Wave Inverter" and the best inverter I found for this project is made by a company called Samlex. The model I found to work best is the PST-300-12A. That's a 300W Pure Sine Wave Inverter that converts 12V of DC current to 120V of AC current.  $140 at Amazon.

STEP 2: FIND A SEALED LEAD ACID BATTERY
These are pretty easy to find at electronic stores or automotive stores. This particular battery is used for boats, scooters or battery backup systems. I found a lot of 5 from an eBay seller for a steal (although I paid a lot for shipping as these batteries are heavy!) because I knew I wanted to build a few of these packs. The SLA batteries I purchase were Rhino 12V 18Ah. These are $38.99 on Amazon right now. The important thing to keep in mind when buying the battery is getting the voltage and amperage correct. It should be at least a 12V and 18Ah.


STEP 3: FIND A CONTAINER
At this point the only other item you would need is something to house and carry the battery components. I went through MANY different iterations, including small tool cases and assorted bags until I finally found the perfect carrying case for my battery packs. I bought three SLR Zoom cases from Case Logic for $23 each on sale. These cases held my power inverter and SLA battery in a vertical configuration exactly like I wanted with no room to spare.  The vertical position is important because it allows me to unzip the bag and plug my lights right into the power inverter which is pointed up.

STEP 4: FIT AND FINISH
I was really trying to avoid the DIY look for my power packs so I went the extra distance and purchased 3 socket power couplers (Like the cigarette or power adapter in your car) so that I could recharge my batteries easily. Then I bought a standard SLA battery charger and soldered a power socket to the business end so that I could easily plug the sockets together to charge each battery. This may be an important detail - be sure to buy a proper Sealed Lead Acid battery charger. SLA batteries can be finicky in how they hold/charge/discharge and you don't want to ruin your new batteries so be sure to buy a proper charger for them.

STEP 5: ASSEMBLY
At this point, once you have all the components you need, it's an easy task to wire everything together. Use some heavy gauge wire and get creative with the electronic connectors you might find at Fry's or Radio Shack. I used standard 1/4 inch studs to secure the wires to the batteries. Keep positive to positive and negative to negative (but if I have to tell you that than you probably shouldn't attempt this project!) and shove everything into the case.  In the photo you can see my battery pack from the top down.  The lid is zipped open, the battery is on it's side and the power inverter is standing up on end.  You can also see the charge socket which is wired to the battery for easy recharging.  To use the pack I simply unzip the lid and plug in.  To recharge the unit I plug one end of my charger into the wall and the other end into the charge socket.

Location Equipment Kits

We often get asked about the kind of gear we shoot or the equipment we use on location so in response we thought we'd give you a sneak peak into our "black boxes".


THE DSLR KIT
Our DSLR kit is the most used kit in the group and the first one to get pulled out for a job. We're definitely a Canon shop. Our digital kit contains a full-frame 1d Mark I body for landscape and wide-angle shots and the 10fps 1d Mark III body for sports and timelapse shoots. If all things are equal, the quality of your image will come down to your choice of lens so our kit includes the Canon 70-200mm f4 L, the Canon 24-70mm f2.8 L, the incredible Canon 85mm f1.2 L and a Tamron Aspherical 17-35 f2.8 to round out the bunch. The rest of the kit includes a set of neutral density filters, Sekonic L-758dr light meter, spare batteries for both bodies, a set of 2-way radios for the crew, an intervalometer for shooting time-lapse, battery charger for the 1d Mark III, various trigger cables and my photographer credentials. This all comfortably fits into the Pelican 1510 watertight case.

THE MEDIUM FORMAT KIT 
As good as digital technology is these days, we still love to shoot film! When a job calls for medium format resolution we turn to film and our medium format kit which includes a Mamiya RZ67 Professional with a 150mm f3.5 portrait lens and 220 film back for studio work.  For location work where we need a more hand-holdable solution we use our Mamiya 645 Pro TL with winder grip, 80mm f2.8 and a 150mm f3.5 lenses. If you're curious how film fits into our digital workflow we bring our rolls to a local vendor for quick turnaround then scan the films through our Canon Canoscan 8800F film scanner. Our last camera in this kit is the Canon G10 with various lens attachments which we use for location scouting or anything that require a really small digital camera with manual control. This all fits into the Pelican 1500 watertight case.

THE LIGHTING KIT
When it came to lighting we made an investment in Paul Buff's Alien Bee lighting system. We found their feature/price ratio to be unbeatable and their customer support to be top notch! The contents of our lighting kit include 3 AB800 monolights with the standard 6" reflectors, an ABR800 Ring Light, a Canon 430EX Speedlight with a set of Gary Fong Lightsphere diffusers along with some various grip gear. We completed our Paul Buff system by selling our Pocket Wizards and buying the CyberSync wireless triggers and the CyberCommander control unit which we love! The CyberCommander allows me to control up to 16 individual lights right from my camera. For good measure we also threw our Bogen 3021 pro tripod into the frame as well. All of this gear fits nicely into the Pelican 1620 watertight trunk.

THE LIGHTSTANDS & MODIFIERS - The last bit of luggage we bring on locations contains all the other grip and light modifiers we might need. This kit consists of 6 air cushioned light stands with assorted clamps and grip, two Dynaphos silver umbrellas, one white Dynaphos shoot-through umbrella, two small Dynaphos softboxes, one Dynaphos 6-foot strip lightbox and a large Dynaphos octobank. Our favorite light modifiers (which aren't pictured) are the 5-in-1 reflector disc by Dynaphos and two Paul Buff 22" High-Output Beauty Dishes.


So there you have it! That's a little bit of what it takes, in terms of equipment, to produce quality photographs on location.