Tuesday, September 13, 2011

How to Save the Photography Industry

corp-linda-203
If you spend any time chatting with photographers or milling around in the photography forums on LinkedIn you'll get a pretty desperate view of our professional industry.  Everywhere you look photographers are complaining that clients have smaller budgets, other photographers are stealing their business by shooting for free, moms with cameras are taking over!  The truth is - photographers need to learn how to evolve!

The photography profession is rooted in tradition.  It's a craft that is both art and science - both creative and technical.  As such, there is no right way to do it.  Just as there are numerous ways to take a photo, there are numerous paths to pursuing it as a career.  You can go to school, you can assist another professional, you can read books to educate yourself on the technical aspects of photography but the hardest thing to learn is the business of photography.  Because there is such a lack of information on how to run a successful photography business we tend to copy or learn from those who have been successful in the past.  We look to other working photographers as a model on how to run our own business.  We send mailers, we run email campaigns, we network.  This is how the industry perpetuates itself.  Each new generation learning from those who have blazed a path before us.  Unfortunately, this is exactly why our industry has grown stale!

One thing I've learned from working in the SF Bay Area is just how quickly an entire industry can move. Silicon Valley is THE birthplace of today's computer technology and I've seen it grow, evolve, boom, bust and transform in the 20+ years I've lived here. I'm not sure why the entrepreneurial spirit here is so high - maybe it's the weather, or maybe it's because we have more venture capital firms than anywhere else in the country.  One thing is certain, the Valley never quits.  There is always some new idea, some new technology, some new college graduate thinking they have the next Facebook!  You very rarely hear people complain about the competition, or blame their customers for the lack of business, or whine about technology moving too fast.  When business starts to slump they look internally, not externally, and will change their business strategies on a dime!

If the photography industry is to survive, we need to adopt these types of business practices.  We need to stop clinging to business models that were created in the days of film.  We need to stop thinking that we are "owed" a successful business just because we know how to use a camera. We need to stop comparing ourselves today to the photographers of yesterday.  Yes, the industry has changed. Yes, technology moves fast.  Yes, everybody can take great pictures now.  So look internally and ask yourself "What else can I bring to the table?"

If your clients aren't paying you what you think you deserve it's because they don't value what you offer.  Commercial photography is a service industry and you can either be a $20 table massage or a $200 spa treatment, the choice is up to you.

Sunday, September 11, 2011

New Production Gear

We've recently upgraded our production equipment so that we can better serve our clients and work more efficiently. One of our new items is the Magliner production cart.  The Magliner is the defacto standard in the TV & Film industry as the go-to workhorse cart.  These carts begin their life as convertible hand carts but can be infinitely customized to suit your needs.  Our cart features the 30" nose extension which holds two carpeted shelves.  The bottom shelf carries our Location Lighting kit, Digital DSLR kit, Medium Format film kitDIY Battery Packs and light modifiers.  The top shelf is our working surface and holds our MacBook Pro, Apple Cinema display and other digital capture equipment. Our light stands are strapped to the outside of the nose extension and the right side of the cart holds our grip equipment like extension cords, clamps, gaffer tape, etc.  We even have an oversized umbrella to keep the equipment dry on those rainy day shoots! Our new production cart reduces setup time by allowing us to move everything we need - all at once!

Styling chair
The other addition to our production gear is our new styling chair.  The old-style director's chair has now become a lightweight, folding aluminum chair with a foldout table and accessory bag provided by Earth Products.  The tall chair folds flat and becomes really easy to use on location. We've added a super-bright LED lamp so our stylist Ivonne can do her magic in the studio or on location in the lowest of light.  The foldout table holds her styling brushes and her cosmetic kit is easily located for quick applications.

All of this new equipment allows us to get a job done as quickly and easily as possible.

Friday, September 2, 2011

Your guide to the latest photography trends & fads

We're living in an exciting time for photography, a renaissance really.  Never before have we had the tools to create images so easily accessible.  You're probably wearing one right now in your pocket or purse if you have a smartphone.  Not only are digital cameras cheap and ubiquitous but we have so many platforms to publish our photos instantly to a global audience with the push of a button.  The upside of all this new technology is the creativity that it's been inspiring from the people who use it.  We've been seeing a LOT of new trends in photography due to the social nature of photosharing and we thought we might help de-mystify some of the most popular ones for you.  So in no particular order we have...

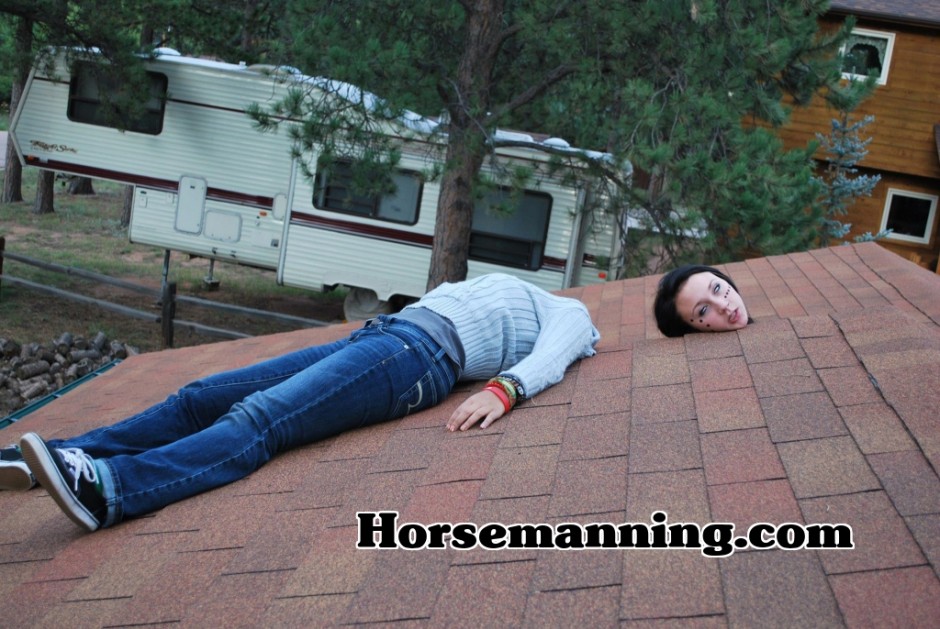
HORSEMANNING is actually a revival of sorts.  It got it's origins from "The Legend of Sleepy Hollow" and was a popular photography fad back in the 1920's.  To properly pull off a horse manning requires two people where one person hides their head and the other person hides their body.

Visual exampleshttp://www.horsemanning.com

PHOTOBOMBING is the technique of appearing randomly in the background of someone else's photo in a lewd, dorky, creative or ironic way.  The trick is to do it right before the photo is taken so that nobody will notice until they look at the photo. Sometimes it happens serendipitously, sometimes it's premeditated but it's almost always hilarious. It's especially funny when celebrities do it!
Used in a sentence - "Charlie Sheen photobombed my wedding portrait."
Visual examples - http://www.thisisphotobomb.memebase.com

PLANKING is the fine art of photographing yourself, or having someone photograph you, while your body is straight, stiff like a board and positioned in a unique or awkward angle - face down.  Generally the more difficult or creatively placed your 'plank' is, the more points you score.  Not for people with lower back problems!

Used in a sentence - "We saw this guy planking in the sewer!"
Visual exampleshttp://www.planking.me


LEVITATION is a technique used to make yourself appear as if you were hovering or levitating just above the ground.  In theory, you simply jump into the air just before the camera is triggered, but in practice it's much more difficult.  The trick is to jump into a pose that doesn't "look" like you jumped into a pose.  Also requires strong legs!
Visual examples - http://yowayowacamera.com
How-to Videohttp://www.digitalrev.com/en/how-to-do-levitation-photography-9276-article.html

IN-GAME CAR PHOTOGRAPHY has become in interesting new genre of "virtual" photography as game developers have introduced the ability to take still photos of the virtual worlds they create.  It started as the "instant replay" feature in race games but has become so sophisticated that the developers of Grand Turismo 5 allow you to control the aperture, shutter speed and focal length of a virtual camera in a virtual world of virtual cars with stunning detail.
Visual exampleshttp://www.gtplanet.net/forum/showthread.php?t=137684

If we've missed anything up-and-coming or if you know of a trend we missed, let us know.  Leave a comment!

Thursday, August 11, 2011

What's wrong with stock photography?

A large part of our target market is made up of independent and small business owners who may think that buying stock photography is a good option for them.  After all, it's cheap, widely available and easy to purchase. Part of our sales pitch is trying to educate these clients on why buying stock photography is the wrong option for them.  It goes something like this...

Branding is all-important these days and should be one of the first thing you define when starting a new business.  Your brand is what sets you apart from your competition and gives your customers something to identify with. Your brand is not your logo, your name or your color palette - your brand is the feeling your customers have about you.  Potential customers want to know that you're the right "fit" for them and they make these judgements extremely quickly which is why it's so important to maintain your brand consistently throughout your marketing channels. There are a whole host of tools you can use to create this feeling such as the tone of your messaging, the design of your marketing and advertising collateral, and especially your social networking.  One of the biggest tools you can use to express your brand is photography!  We are visual creatures and you can communicate an entire story in one image.  Remember the adage - "one picture is worth a thousand words."  So when it comes to creating a feeling and desire in the minds of your customers for your products or services, there's no better way to do it than with pictures.

Now the important question becomes...WHICH pictures?  How do you find photography that expresses exactly what you want to communicate about your brand to your customers?  This is where it's tempting to resort to stock.  It's easy to just load up a stock agency on your browser, sign up for an account, add a credit card and browse away.  But when you look closely at the content of stock photography you'll notice how generic it is.  Photographers who shoot stock are taking a "shot gun" approach to subject matter and hoping they shoot an image that you'll buy.  Don't get me wrong, there are some very talented stock photographers who shoot images that could be described as art - but they haven't had a conversation with you about your specific needs or tried to understand what your message is.  To me, stock photography is the McDonalds of the photography world.  It's cheap, easy to find, but completely lacks substance and leaves you feeling like crap after you eat it.

If you have a well-crafted brand and care about communicating the subtly of that brand to your customers to evoke a real emotion or feeling - you should really commission an experienced photographer to help you.  We love working with independent and small business owners to help express and define their brand to create a real desire for your products or services.   We're like the Whole Foods of the photography world.  You may pay a little more but you enjoy the experience, you get exactly what you want, and you feel great about your purchase!


Monday, May 16, 2011

How To Capture Action

CatsHill-210.jpg

Capturing fast-moving action is essential for sports photography and there are a few things to know before taking on this challenge.

The first thing you need to decide when capturing fast-moving objects is how you want them to appear in your photograph.  In the shot of the bike racer above we wanted to enhance the feeling of speed by blurring the background but there may be cases where you want to freeze the action so that everything is in focus.  The trick to this creative style is choosing your shutter speed appropriately.  The faster your shutter speed, the more you can stop motion - the slower your shutter speed, the more blur you create.

To achieve the shot above, we set our camera to Tv (Shutter Priority) so that we could adjust our shutter speed and let the camera set the aperture automatically.  Normally we would meter the scene with an ambient light meter and shoot in Manual mode but this day was partially overcast and the light values were changing constantly due to the cloudy conditions so we wanted to let the in-camera meter do some of the heavy lifting. We chose to shoot at ISO 200 so that we could reach higher shutter speeds without introducing too much noise. To get the right amount of blur we used trial and error (also knows as "chimping") until we settled on 1/50th. Finding the right speed is a but tricky because if you go too low, it becomes impossible to hold the camera still enough to capture anything sharp. You'll have to experiment a bit to get the right setting.  The camera adjusted the aperture to f13.

Another challenge when shooting fast-moving subjects is focus.  This is where a high-end, professional camera really pays for itself.  Our Canon EOS 1d Mark III is known as a "sports shooter" and has a newly redesigned auto focus system with 45 auto-focus points, 19 of which are "cross-type" points which can focus on horizontal and vertical lines of contrast.  To get this shot, we set our auto-focus to AI Servo mode which can intelligently track moving objects to predict correct focus.  Proper focus, however, isn't magic and doesn't always require such sophisticated technology.  Road criterium racing is a great way to get started with sports shooting because the riders complete a lap roughly every 2 minutes so it gives you plenty of opportunity to setup a shot.  To get this shot without a sophisticated auto-focus system you could simply set your lens to manual focus and pre-focus your lens to the spot you want to shoot.  We always have a "zone" in which we want the shot to take place.  To establish our zone we study the background/foreground elements, lighting, and path the riders take in the road and determine what will make the best composition.  Once you have a zone picked out it's pretty simple to pre-focus on something in that zone.  This is another area where "chimping" is perfectly acceptable - while determining the right focus for your zone, just use trial and error until you get it right. That's one of the beauties of digital photography!

The last thing you'll need to capture action is a good technique.  All good sports shooters have a natural instinct for being able to anticipate the "right" moment that comes with years of experience and an in-depth knowledge of the sport.  There are some things you can do however to improve your chances.  Set your camera to Continuous shooting mode.  In this mode your camera will take a photo as fast as it can for as long as you hold the button down.  When shooting in Continuous mode, you can start shooting a slight second before the moment and continue shooting slightly after the moment to ensure you captured just the right shot.  Another technique that we used for the shot above is "panning".  If the camera was held completely still at 1/50th, the rider would pass right through the frame before the shutter closed, rendering him completely blurry and the background completely in focus - the exact opposite of what we wanted.  So to properly pan this shot, we begin pointing the camera at a location slightly down the street and as the rider rides by we move the camera to the right, following him at exactly the same speed he is moving.  This takes practice and patients but when you get it right, it's magical.

Tuesday, May 10, 2011

How To Balance Flash & Daylight


For those of you who participated in our poll, it's clear that you are interested in more "how-to" articles and one of the common questions we get asked is "How do I balance flash light and day light?"  To answer the question, let's deconstruct one of our images in which we balanced a sunset with off-camera fill flash.

In this image, we positioned our model high up on a grassy hill with the sunset behind her.  Definitely a challenging scenario for a camera set to Auto mode.  What you would get would be an image that was exposed for the sky and a model completely obscured by shadow.  If your camera has a built-in flash it would probably use it to fill the model but on-camera flash will produce very harsh shadows and potentially some red-eye.  The solution to lighting this scene is to balance an off-camera flash with the available daylight.

Learning how to deconstruct a photograph is a valuable tool for learning and there are two things that will make it easier.

  1. Find the light source(s) by observing the shadows
  2. Look into the reflections in the eyes to see the shooting setup
In this case, you can't see her eyes close enough but if you look carefully you'll see the tell-tale signs of a double shadow under her forearms and around her hands.  This tells us immediately that at least two light sources were used to light her.  And if you look REALLY closely you can see that one shadow is darker and harder than the other, which tells us that one strobe was set to a lower power than the other.

Ok enough guessing...here's how to balance flash & daylight for an image like this.  The first thing to do is determine the base exposure value for the scene.  In our case, we measure exposure by taking an ambient reading from our Sekonic L-758DR light meter. Set your camera to M mode and use this exposure setting to control the ambient light.  Now we can make our creative decisions.

We knew we wanted this scene to be bright and cheerful with a small difference between the fill light and sunlight.  The first creative decision you need to make when balancing light is "how much balance do I want to achieve?".  In this case we wanted a natural looking image that didn't look like we were using artificial light but we underexposed the ambient scene by 1 stop so that we could saturate the colors a bit more.

The next thing to do is determine your strobe exposure.  The placement, power output and diffusing of your lights will all help achieve a specific look.  We placed two AB800 strobes with standard parabolic reflectors on either sides of the model at about the same distance as the camera.  We then used our Sekonic L-758DR to trigger the strobes and take an exposure reading.  We lower the power output and take another reading until we achieve the same exposure value as the ambient light (eg: both ambient and strobes measure f8)  We then dropped the power settings of the left strobe so that the front of our model didn't appear flat.  If we had lit her completely evenly with two strobes there wouldn't be any depth to her clothes or body.  We used one more light directly behind the model to create a "rim" effect on her skin and hair. That light source is called the Sun!

Learning to balance strobe and ambient light is an extremely powerful technique that will elevate your photography to the next level.

Sunday, May 1, 2011

Accept Credit Cards with Square


Looking for a way to accept credit card payment quickly and easily with your iOS or Android device.  Look no further than Square.  We've been using this small business solution for a few months now and have fallen in love with the technology.  You simply sign up for an account, link a bank account for your deposits, and after you receive your free card reader in the mail, you're ready to start taking credit card payments.  There's no yearly fee, no activation fee, no hidden fees at all really...just a 2.75% transaction fee.  Give it a try!